• Home
  • About
  • Blog
  • Categories
  • Terms and Conditions
  • Media & Press

Smallish Home

Organization

Organizing a First Aid and Medicine Kit

April 30, 2021

Learn how to use Cricut Joy and Smart Vinyl labels to create an adorable and functional multi-level kit perfect for organizing and storing first aid supplies and medications. 

Disclosure: This post was sponsored by Cricut and contains affiliate links.  This means I may receive a commission from the brand if you make a purchase using one of my links.  As always, all opinions are my own. 

Ahhh, Spring.  It’s that time of year where the days get warmer and it just feels so good to be outside again.  We love spending our afternoons running around the yard, but between allergies and cuts and scrapes from bike riding we are constantly reaching for the antihistamines and Band-Aids.  

Unfortunately, our medical drawer in our pantry just wasn’t cutting it anymore.  It had turned into a jumbled mess and was nearly impossible to find what we needed.  This led to duplicate purchases and panic when we couldn’t find the Neosporin or Tums.

So when Cricut reached out to see if I wanted to try the Joy, I knew exactly the project to tackle.  For months I’d been wanting to create a new combination first aid/medicine kit for our kitchen and now was the time!

smallishhome cricut joy

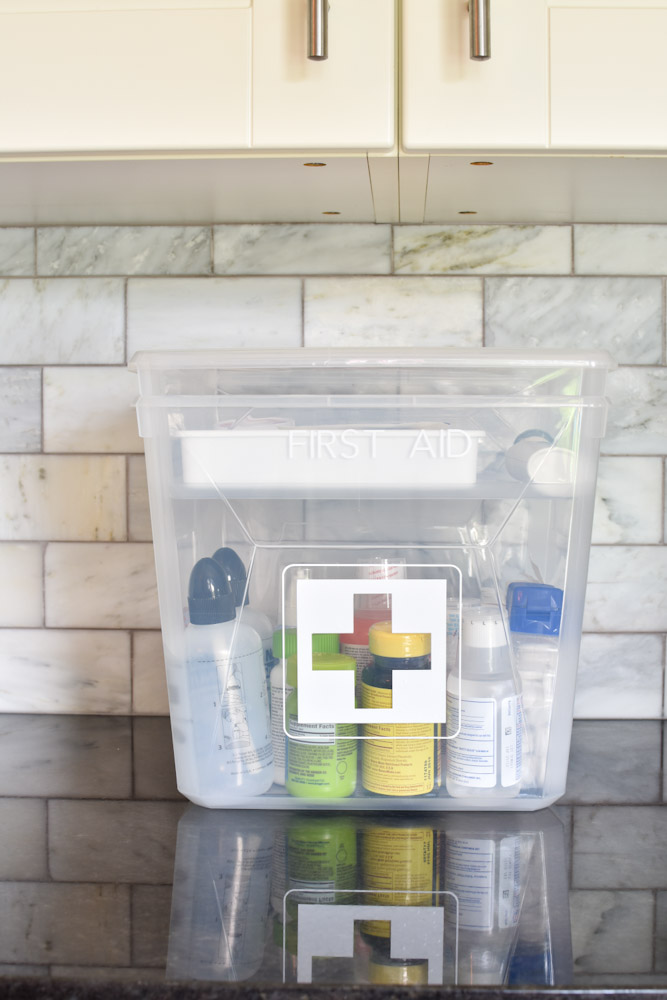
I was excited because Cricut can help you get organized by creating large, eye-catching labels, like the medical symbol, that are easy to see.

If your medicines or first aid supplies are in need of a spring cleaning, follow these 5 easy steps to create a kit of your very own.  

Step 1: Gather all your medications  

organizing medication

It’s important to get everything in one place because medications like to hide all over the house – the bathroom, the kitchen, the pantry, the linen closet, etc.  I like to use the dining table or kitchen counter so I have room to spread out and examine all the bottles, tubes, and boxes.

Next, check each item for an expiration date.  Medications lose their potency quickly and it’s important to make sure the items you keep are effective when you need them.  

As you identify items that are expired, make a list of things you need to replace.  I used to keep EVERY SINGLE TYPE of medication on hand, but I found I just wasn’t using things before they expired.  Now, I focus on stocking medications that our family uses frequently or urgently. 

Anything for special situations can stay at the store and be purchased when needed.

Here are the items I keep in stock and unexpired:

  • Pain/fever medicine for both kids and adults
  • Allergy medications (in season)
  • Benedryl
  • Tums
  • Cough syrup
  • Prescription inhalers for my son with asthma
  • Vicks vapor rub
  • Anti-itch cream
  • Band-Aids
  • Neosporin
  • Nasal Decongestants
  • Cold medication

Your list will (and should!) look different than mine.  Every family has different needs and preferences and you want to make sure you tailor your kit to fit your family.

If you find yourself missing anything important, write it on your grocery list and pick it up next time you are at the store.  

 Step 2 – Assess first aid supplies

Band-aids can be a real pain to store because they come in all different shapes, colors, and sizes.  The boxes conceal how many are left, so while it may look like you have a whole box of Band-Aids, only one may remain in the box.  

And with young kids in the house, It’s really important for me to have a functional first aid kit that lets me find the supplies to treat skinned knees quickly.

Thus I decided the top of the kit would be dedicated to organizing first aid supplies.  Because the small bin nests into the larger bin, it’s easy to remove and transport to wherever it’s needed, whether that’s the bathroom or even outside. 

organized band aid first aid tray

first aid organizing insert

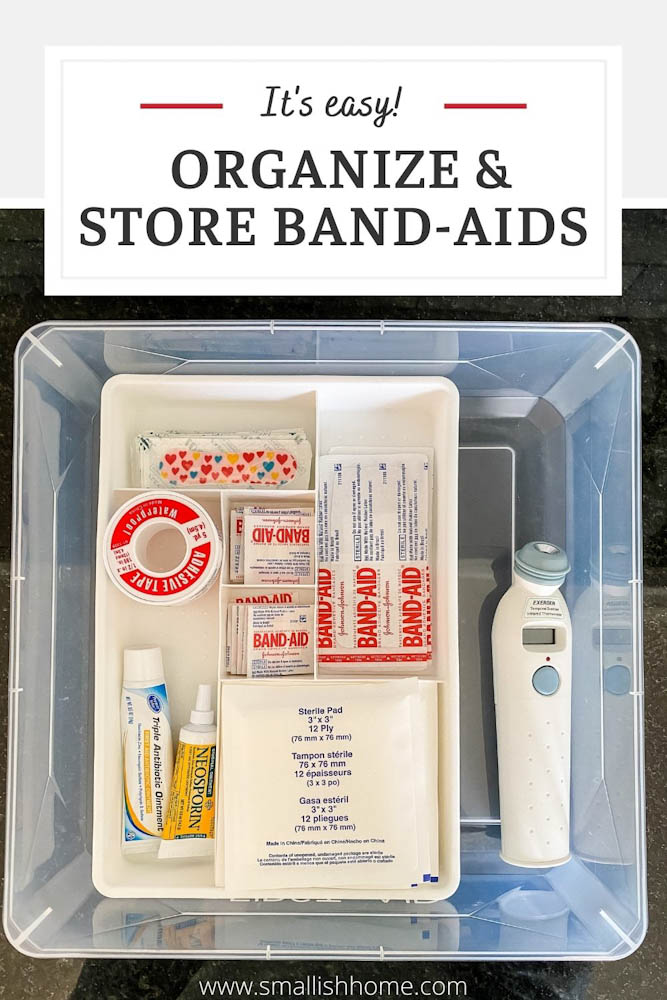
I repurposed a small drawer organizer from my bathroom as a way to organize all the different-sized bandages, creams, and tape. Taking Band-Aids out of the packaging saves a ton of space and makes it easy to 1) find the size or character bandage you need and 2) know when you are running low.

Step 3 – Find a bin that will fit your tallest medicine bottles 

I love clear bins for medicines.  Why?  Because they make it clear what’s inside.  Even with a label, it can be helpful to see the items in a bin when you are looking for something specific.  Lids that click on keep everything securely inside and away from little hands.  (I also put the medications up high, just to help prevent the kids from getting in without adult help).  

For my medicine and first aid kit, I used one of my favorite clear bins from Target.  The Made by Design bins in large and small nest perfectly to create a layered system that also happens to fit in my kitchen cabinets.

The large bin is much taller and gives me space to store my medication bottles upright.  This prevents spills and makes it easy to find and put away exactly what I need without layering.

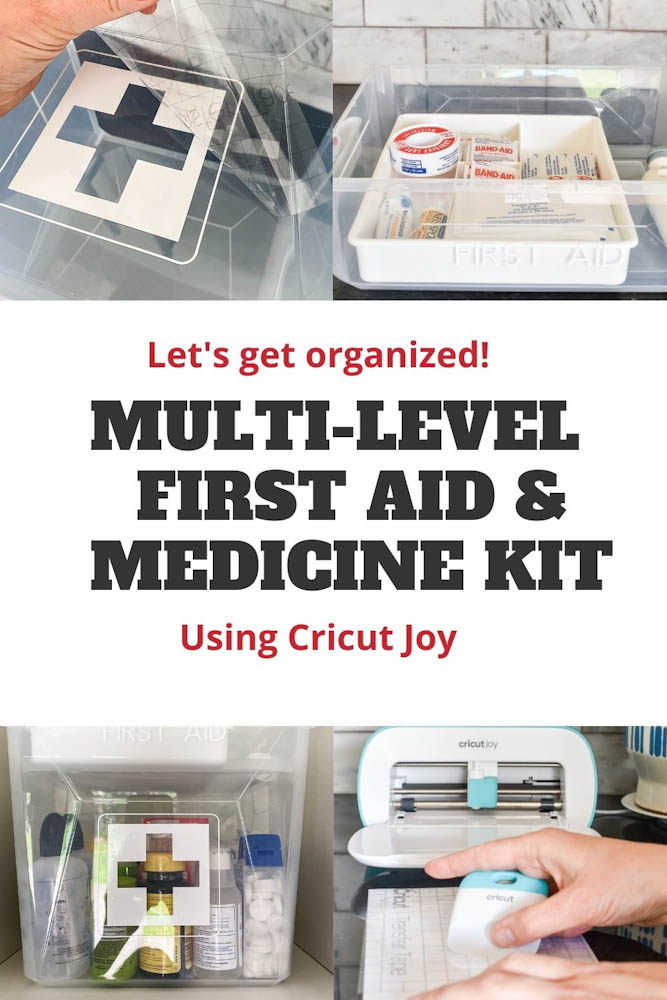
Step 4 – Create a custom label with Cricut Joy

cricut joy and accessories

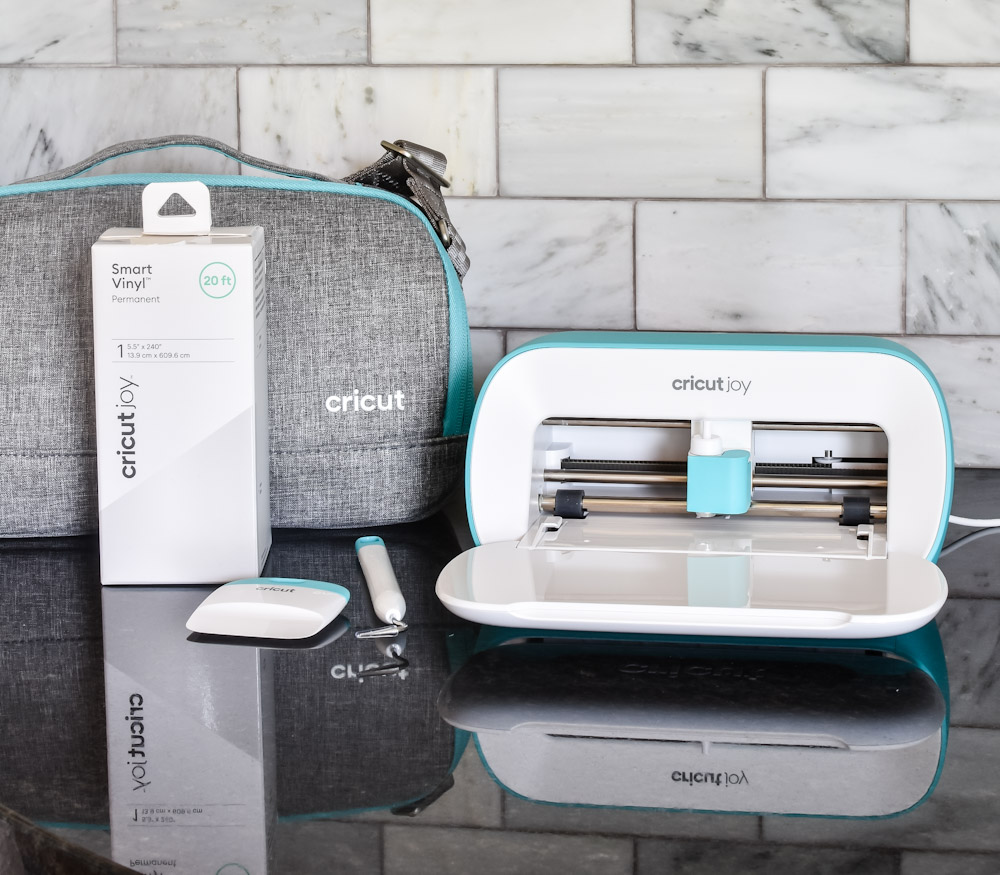
I was so excited to try out my new Cricut Joy with this project!  You know I love a good label, and this was the perfect place to start out as a Cricut newbie. 

I was a bit worried about the learning curve, but thankfully the Smart Materials are easy to use and I found that the whole project took less than an hour to put together.  

multi layer first aid and medicine kit

Here are the step-by-step instructions for creating custom labels first aid labels:

Supplies needed

  • Cricut Joy
  • White Permanent Smart Vinyl
  • Starter Tool Set
  • Transfer Tape
  • Storage Case

Instructions

Open up the Cricut Design app on your phone

Click ‘Add Image’ and look for the medical symbol.  Then click ‘Add Text’ and add the words “First Aid” in the font Avenir Next.

Size your design to be no wider than 4.5″

Cut a piece of Smart Vinyl Permanent in white the size of your design and place it in the Cricut Joy.

Press ‘Create’ in the App and follow the directions on the screen.  If you are using Smart Vinyl, there is no need to use a cutting mat.  

cricut joy

Now for the best part – the cutting!  It’s incredibly satisfying to watch the machine cut out all the intricate lines on the design.   

To remove the excess vinyl, use the pointy weeding tool to gently pull away and part of the design that you want to be clear.  Then, cut a piece of transfer tape the size of your labels, remove the backing, and stick it on your design. 

cricut transfer tape

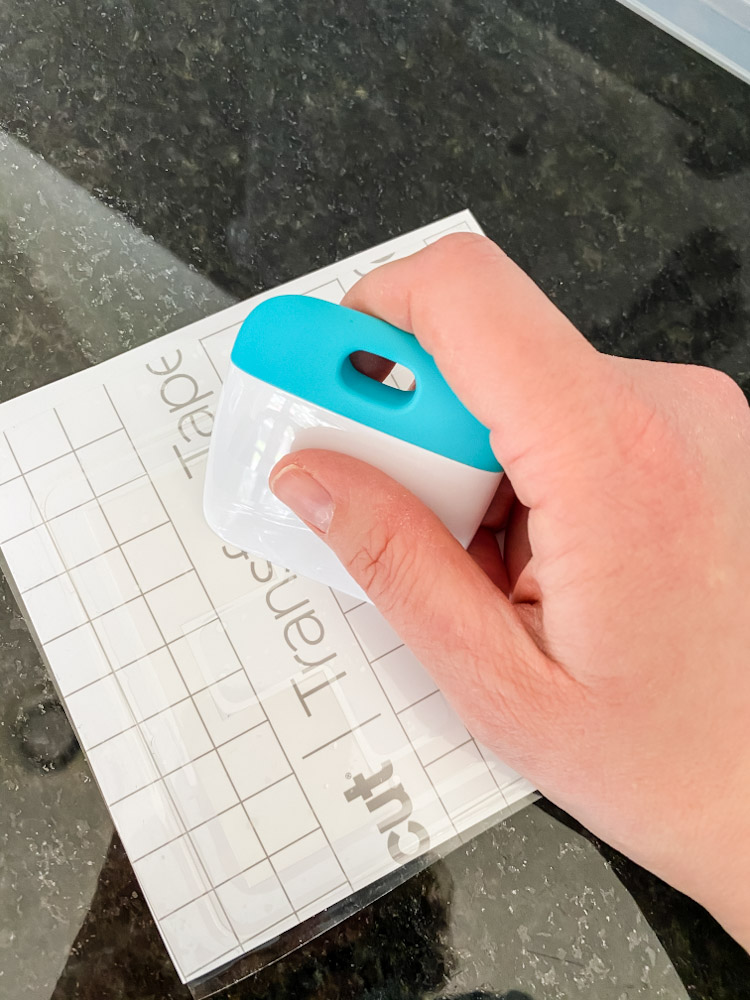
Use the scraping tool to ensure the design is stuck to the Transfer Tape.  Then remove the backing of the Smart Vinyl and carefully place your design on your bin.  Make sure it is visually centered and level.

Use your fingers and the scraping tool to press the design on your bin then carefully pull the transfer tape off, leaving the vinyl on the bin.   

removing transfer tape

Voila! The labeling is complete! Save your remaining vinyl for another project and store your Cricut Joy in the handy storage bag, ready to pull out for all your future labeling projects.  

Step 5 –  Time to fill your newly labeled first aid medicine kit! 

Place all medications in the bottom deep bin, standing vertically.  If you have more than will fit in one bin, consider using multiple bins and organizing by the type of medication. 

Nest the smaller bin in the deep bin and place the first aid organizer and any other first aid tools in the bin.  Cover with a clear lid and store in your kitchen or pantry. 

Organized first aid and medical kit

large bin  // small bin

That’s it!  Now you have a perfectly organized, smartly labeled bin to help you find just the right Band-Aid or medication in a pinch. 

And if you want to save these instructions for later, be sure to pin one of these images to your Home Organization board on Pinterest.

plastic bin first aid kit

organized band aids

cricut label first aid kit

Don’t forget to follow @smallishhome while you are there!  


0
0 Leave a Comment

cricut joy first aid labels medicine organization

Previous 10 Small Space Solutions for Organizing the Bathroom
Next 7 easy tips for maximizing clothing space in your small closet (no power tools required!)

Related Posts

How To Organize Kitchen Drawers and Efficiently Shop For Dividers

Small Sink Cabinet Organization

Organizing a Small Linen Closet

Reader Interactions

Leave a Comment Cancel reply

Your email address will not be published. Required fields are marked *

Primary Sidebar

About

About

Hi! I’m Lisa and I dig smallish homes. I believe they bring families together and provide a constraint on the accumulation of stuff. I’m obsessed with rethinking room design and storage solutions in order to live the life I want in the house I have. I hope you stay a while!
read more

Editor’s Picks

  • Organization

    How To Make Vinyl Pantry Labels Wit...

JOIN THE NEWSLETTER

Categories

  • Cleaning
  • Decluttering
  • Design
  • DIY
  • Lifestyle
  • Organization
  • Shopping

Instagram

Spring is just around the corner, but I’m over h Spring is just around the corner, but I’m over here still making cozy winter soups.  I added a soup board to my kitchen, including wide mugs and various toppings and it was just what we needed to make our weeknight dinner special.

The soup is my own homemade gluten free/dairy free tomato soup and I have a blog post with the recipe + sources for items included in my soup board. It’s simple, hearty and takes less than 20 minutes to make.  Be sure to check it out!  #soup #easyrecipe #kitchenorganization #stayorganized #letsgetorganized #homeorganization #organizedkitchen #organizing-hacks #declutteriing #declutteryourlife
#Ad Let’s organize my new small-space coffee bar #Ad Let’s organize my new small-space coffee bar! Adding a large wood turntable was the key to a tight corner in my small kitchen. It’s so much easier to fill up the water with a quick spin than squeezing in between the counter and cabinets. Plus, how cute are those marble ceramic canisters? They’re perfect for holding coffee pods, sweetener and spoons!#QVCpartner #loveQVC #coffeebarorganization #kitchenorganization #asmrorganizing #nespresso #letsgetorganized #homeorganization #organizedkitchen #organizing-hacks
 #declutteriing #declutteryourlife #stayorganized
#Ad QVC finds that make spring-cleaning a breeze! #Ad QVC finds that make spring-cleaning a breeze! The fluffiest microfiber cloths that grab dust, shine stainless steel appliances, plus they’re machine washable and dryer safe. The Broombi. A unique broom with a flexible blade that cleans dirt and hair from all hard-to-reach surfaces and cleans up with a quick rinse in the sink. With these finds you’ll be done with spring-cleaning in no time!  #QVCpartner #loveQVC #springcleaning #cleaningtips #cleaninghacks #letsgetorganized #homeorganization #organizedhome #decluttering #declutteryourlife #stayorganized
#Ad 3 Tips for Organizing Under Your Sink!  1) Ta #Ad 3 Tips for Organizing Under Your Sink! 
1) Take advantage of vertical space with clear stacking drawers.
2) Turntables make it easy to access cleaning supplies with a spin.
3) Take things out of their original packaging to reduce bulk and make it easier to see what you have.
 
I’m loving these clear plastic drawers from @QVC and now want to add them under all the sinks in my house. They slide easily and are nice and deep! Can’t you just see them under a bathroom sink as well?
#QVCpartner #loveQVC #underthesinkorganization #kitchenorganization #letsgetorganized #homeorganization #organizedkitchen #organizinghacks #declutteriing #declutteryourlife #stayorganized

Disclaimer

© Smallish Home, 2020. Unauthorized use and/or duplication of this material without express and written permission from this site’s author and/or owner is strictly prohibited. Excerpts and links may be used, provided that full and clear credit is given to Smallish Home with appropriate and specific direction to the original content.

Amazon Associates Disclosure

Smallish Home is a participant in the Amazon Services LLC Associates Program, an affiliate advertising program designed to provide a means for sites to earn advertising fees by advertising and linking to amazon.com

Archives

  • March 2023
  • February 2023
  • January 2023
  • December 2022
  • November 2022
  • October 2022
  • September 2022
  • August 2022
  • July 2022
  • June 2022
  • April 2022
  • March 2022
  • February 2022
  • December 2021
  • November 2021
  • October 2021
  • September 2021
  • July 2021
  • June 2021
  • May 2021
  • April 2021
  • March 2021
  • February 2021
  • January 2021
  • December 2020
  • November 2020
  • October 2020
  • September 2020
  • August 2020
  • June 2020
Spring is just around the corner, but I’m over h Spring is just around the corner, but I’m over here still making cozy winter soups.  I added a soup board to my kitchen, including wide mugs and various toppings and it was just what we needed to make our weeknight dinner special.

The soup is my own homemade gluten free/dairy free tomato soup and I have a blog post with the recipe + sources for items included in my soup board. It’s simple, hearty and takes less than 20 minutes to make.  Be sure to check it out!  #soup #easyrecipe #kitchenorganization #stayorganized #letsgetorganized #homeorganization #organizedkitchen #organizing-hacks #declutteriing #declutteryourlife
#Ad Let’s organize my new small-space coffee bar #Ad Let’s organize my new small-space coffee bar! Adding a large wood turntable was the key to a tight corner in my small kitchen. It’s so much easier to fill up the water with a quick spin than squeezing in between the counter and cabinets. Plus, how cute are those marble ceramic canisters? They’re perfect for holding coffee pods, sweetener and spoons!#QVCpartner #loveQVC #coffeebarorganization #kitchenorganization #asmrorganizing #nespresso #letsgetorganized #homeorganization #organizedkitchen #organizing-hacks
 #declutteriing #declutteryourlife #stayorganized
#Ad QVC finds that make spring-cleaning a breeze! #Ad QVC finds that make spring-cleaning a breeze! The fluffiest microfiber cloths that grab dust, shine stainless steel appliances, plus they’re machine washable and dryer safe. The Broombi. A unique broom with a flexible blade that cleans dirt and hair from all hard-to-reach surfaces and cleans up with a quick rinse in the sink. With these finds you’ll be done with spring-cleaning in no time!  #QVCpartner #loveQVC #springcleaning #cleaningtips #cleaninghacks #letsgetorganized #homeorganization #organizedhome #decluttering #declutteryourlife #stayorganized
#Ad 3 Tips for Organizing Under Your Sink!  1) Ta #Ad 3 Tips for Organizing Under Your Sink! 
1) Take advantage of vertical space with clear stacking drawers.
2) Turntables make it easy to access cleaning supplies with a spin.
3) Take things out of their original packaging to reduce bulk and make it easier to see what you have.
 
I’m loving these clear plastic drawers from @QVC and now want to add them under all the sinks in my house. They slide easily and are nice and deep! Can’t you just see them under a bathroom sink as well?
#QVCpartner #loveQVC #underthesinkorganization #kitchenorganization #letsgetorganized #homeorganization #organizedkitchen #organizinghacks #declutteriing #declutteryourlife #stayorganized
#Ad Tea Organization! I’ve been searching for th #Ad Tea Organization! I’ve been searching for the perfect solution for storing and organizing tea, and think I’ve found it in these stacking divided boxes. I used one for herbal and one for caffeinated tea, and now it’s so easy to find just the right flavor. What’s your favorite tea? Please share as I’m always looking for new flavors to try! 
#QVCpartner #loveQVC #teaorganization #kitchenorganization #asmrorganizing #pantryorganization #letsgetorganized #homeorganization #organizedkitchen #organizinghacks #declutteriing #declutteryourlife #stayorganized
Have little boys who love Nerf blasters? Here are Have little boys who love Nerf blasters? Here are 3 ways to organize and store them so you don’t have to look at them all the time. My personal favorite is the extra large basket! #nerfblasters #toyorganization #toyorganizationhacks #playroomorganization
An easy DIY floating shelf for above a top loading An easy DIY floating shelf for above a top loading washer and dryer. It’s the perfect way to add storage while still allowing access to the water hookups & the washer door. All the details and instructions are on the blog - click the link in profile to read! #diyfloatingshelf #laundryroom #laundryroomideas

ConvertKit Form

Copyright © 2023 Smallish Home · Theme by SheShoppes